I have approached the “Green” living concept from most every directiom. I’ve researched and blogged on eco friendly ways to clean your house, on water saving plumbing fixtures, how to conserve water and electricity and the list goes on and on. While reading and researching for today’s blog I ran across a list of 19 online sites that appear to have all the answers and approached to living “green”. So if you’ve been straddling the fence, you been trying to find answers to help you make up your mind and AL Gore and I haven’t pushed you over the edge then here’s answers for EVERYTHING you ever wanted to lnow about the subject.
The Green 10: Top Online Sources for the Aspiring Ecophile, By Erin Loechner of Design for Mankind)
“Sure, you've heard of the usual suspects (treehugger.com and thegreenguide.com to name a few), but there are some missing links in your chain of eco-fabulousness. Here, ShelterPop rounds up a few of our favorite green online home sources you've probably never heard of. Break out the granola and bookmark away!”
1. Greenzer.com
A shopping aggregator, Greenzer leads you to the best eco-friendly retailers on the web. You'll save time, energy and reduce that carbon footprint...all in your undies!
2. GoodGuide.com
A beta site that uses government and environmental group research, Good Guide rates household items and foods according to which are healthier for your body and our Earth.
3. SustainableBusiness.com
Sustainable Business lists top sustainable stocks in today's economy and aids in tracking the performance of your favorite green corporations.
4. CarbonFund.org
A nonprofit carbon credit organization with over 450,000 members, CarbonFund offers carbon footprint calculators and additional tools to support energy efficiency, renewable energy and reforestation projects around the world.
5. Earth911.com
This handy site lets you search for recycling centers by entering your zip code or street address.
6. DineGreen.com
A brilliant resource that allows you to search by restaurant category, location or keywords to spot eco-friendly eateries in your hometown.
7. Ecorazzi.com
Our list wouldn't be complete without a bit of indulgence, would it? Find out how your favorite actors and musicians fare in their quest to save the planet.
8. Ewg.org
Check how toxic that new mascara is with Environmental Working Group's searchable database of more than 42,000 cosmetic products.
9. EcoGeek.org
For the gadget lover in your family, EcoGeek offers the latest information on new technological advances and green innovations.
10. Grist.org
An information aggregator, Grist lists daily headlines on environmental topics, making this site your one-stop destination for all things green.
I know that this would appear to cover the full gamut on the subject but if you know of more interesting and enlightening sites how about letting us know. Use the comment section below and I’ll revoew the sites and get the word out.
Sunday, February 7, 2010
Thursday, February 4, 2010
10 Quick Updates for yor Kitchen
In past I have discussed various short cuts to update a bathroom, your house to make it ready to sell, to freshen up a bathroom, a bedroom and many other approaches to week end DIY projects. Two recent projects, one in my own kitchen and on that my best friend (Crash & Burn Hennecy) did his, brought to mind some ideas to pass on. Here are 10 things you can do to update your kitchen without having to get one of those now non-existent home equity loans. I will include some pics and details of our two projects also.
1. Update Your Cabinetry Hardware
These small items say big things about your kitchen style. Changing out your old knobs and pulls to brushed nickel or bronze will create a whole new decorative touch. This was one of the first things we did to my little Florida home where I live now. It’s a typical 1980’s manufactured home and the kitchen was still as it was built. A quick look through Ebay found some brushed contemporary pulls at a bargain price. I think we spent less than $100 for all of them (see pic in #10 )
2. Repaint The Walls
Nothing changes the face of a room like a fresh coat of paint. A splash of color can help set a new tone for your kitchen style - warm reds and yellows for a Tuscan feel, neutrals to make a traditional classic or vibrant greens and blues to modernize your look. Don’t be afraid of color. Avoid dark colors for a small space.Cost for my kitchen, $20 gallon of paint and a weekend
 3. Change Out Window Treatments
One of the first changes that will get people talking is new window treatments. There are many fabrics and materials to choose from, including bamboo, roman shades or a bold graphic print. I have gone with plantation style shutters throughout the entire house. Fabric curtains in a kitchen are hard to keep clean and have an old fashioned look. I found my whole house of plantation shutters (pic on right) on “Craigslist” (11 sets new still wrapped) with a retail value of $3800 for (pic on right) $250. An unfortunant result of a foreclosure sale. Although you may not find that good of a deal I see deals online most every week
 4. Put Up Some Shelves
Installing shelves is an easy, innovative way to add space with a decorative touch. New wooden or glass shelves over the sink or next to your cabinetry will allow you to clear counter space from small appliances you don't use everyday. You can also showcase decorative and sentimental items on your new shelves. I took it a step further and solved an awkward corner formed by the refrigerator and an oddly angled wall. I simply went to the “Habitat for Humanity” recycle store and bought a small based cabinet. Made a top out of plywood covered in ceramic tile. Total cost less than $200. Note that I made the back side with a hang over for barstools and place to tuck the dogs dishes and the trash can.
5. Replace Your Faucets
It's one of the most frequently used items in a kitchen, so it should be one you love. You can update your faucet relatively inexpensively, adding a refreshed look to your sink area and also lowering water and energy costs. My friends at National Builder Supply have hundreds to choose from priced for ANY budget.
6. Sweep It Under the Rug
One way to update the look of your floors without the cost of new flooring is with a rug. You can find many rugs that are durable to high foot traffic, but also attractive to compliment your kitchen style. Painted floors have also been around since pioneer days before floor coverings were ever invented. Get creative and paint a design or border on a tired or worn out floor.
7. Set The Mood With New Lighting
Make your kitchen a friendly, inviting space with a new lighting system. Consider updating the existing fixture or installing track lighting. You can also add ambiance with under-the-cabinet task or puck lights that are easy to install. Pendant lights over a bar area or sink can also add a lot to the décor as well as needed extra light. This is another thing to check NBS for. They are a Progress Lighting distributor.
 8. Put Up a Faux Backsplash
You don't have to take on a tiling extravaganza to refresh the little space over your sink. Add galvanized steel flat sheets as a backsplash and make a sleek, seamless effect that compliment your appliances. Although don’t be afraid to tackle a ceramic tile backsplash. Here is what Mike did in his kitchen one weekend.
Here is the process in his own words:
"Our backsplash was not only plain and white it had some repair work that had been done that left the surface with uneven swirls of drywall compound. In a word it was ugly. After a couple of visits to our big box home centers we chose a travertine tile in a 2"x4" subway pattern. We had wanted glass tile but could not justify the cost. Our compromise was to put a glass mosaic tile accent insert in the travertine. This gave us some of the glass tile we wanted but kept our cost down. I have limited experience doing any tile work but it is something that the average person can tackle with a little patience. A premix mastic was used to adhere to wall and a no-seal grout was used that eliminated the need to seal the grout. However since travertine is covered with tiny holes, and indentations it was necessary to seal it with a stone seal prior to applying grout. If this had not been done the grout would have filled in all the texture of the travertine. This made for easy clean up and no problems having to remove grout that adhered to the surface of the travertine tiles. Does it look like a professional tile job ? Probably not. Is the wife happy ........... yes!" Total material cost..$215.00.
9. Add a Kitchen Cart
Your kitchen can appear more spacious with less items on the countertops. A small kitchen cart can house small appliances and cookware for easy access and free up counter space from clutter. Here is where you can shop around and find one at many of the big box stores or on Craigslist or simply improvise one utilizing a surplus base cabinet on wheels with a top that matches your existing kitchen counter or simply butcher block. Use the cart as a center island and roll it out of the way when you need more floor space.
 10. Refinish Your Cabinets
You'll be surprised how easy it can be to reface your cabinets. Try a faux finish for a rich, antique look. Add some detailed painting to create highlights and shadows that give the sense of depth. Or take out the center face of a cabinet door and install a glass front. When replaced the cabinet hardware in my little kitchen we painted the cabinets a warm cocoa brown, giving a dinky little kitchen a warmer look.
1. Update Your Cabinetry Hardware
These small items say big things about your kitchen style. Changing out your old knobs and pulls to brushed nickel or bronze will create a whole new decorative touch. This was one of the first things we did to my little Florida home where I live now. It’s a typical 1980’s manufactured home and the kitchen was still as it was built. A quick look through Ebay found some brushed contemporary pulls at a bargain price. I think we spent less than $100 for all of them (see pic in #10 )
2. Repaint The Walls
Nothing changes the face of a room like a fresh coat of paint. A splash of color can help set a new tone for your kitchen style - warm reds and yellows for a Tuscan feel, neutrals to make a traditional classic or vibrant greens and blues to modernize your look. Don’t be afraid of color. Avoid dark colors for a small space.Cost for my kitchen, $20 gallon of paint and a weekend

One of the first changes that will get people talking is new window treatments. There are many fabrics and materials to choose from, including bamboo, roman shades or a bold graphic print. I have gone with plantation style shutters throughout the entire house. Fabric curtains in a kitchen are hard to keep clean and have an old fashioned look. I found my whole house of plantation shutters (pic on right) on “Craigslist” (11 sets new still wrapped) with a retail value of $3800 for (pic on right) $250. An unfortunant result of a foreclosure sale. Although you may not find that good of a deal I see deals online most every week

Installing shelves is an easy, innovative way to add space with a decorative touch. New wooden or glass shelves over the sink or next to your cabinetry will allow you to clear counter space from small appliances you don't use everyday. You can also showcase decorative and sentimental items on your new shelves. I took it a step further and solved an awkward corner formed by the refrigerator and an oddly angled wall. I simply went to the “Habitat for Humanity” recycle store and bought a small based cabinet. Made a top out of plywood covered in ceramic tile. Total cost less than $200. Note that I made the back side with a hang over for barstools and place to tuck the dogs dishes and the trash can.
5. Replace Your Faucets
It's one of the most frequently used items in a kitchen, so it should be one you love. You can update your faucet relatively inexpensively, adding a refreshed look to your sink area and also lowering water and energy costs. My friends at National Builder Supply have hundreds to choose from priced for ANY budget.
6. Sweep It Under the Rug
One way to update the look of your floors without the cost of new flooring is with a rug. You can find many rugs that are durable to high foot traffic, but also attractive to compliment your kitchen style. Painted floors have also been around since pioneer days before floor coverings were ever invented. Get creative and paint a design or border on a tired or worn out floor.
7. Set The Mood With New Lighting
Make your kitchen a friendly, inviting space with a new lighting system. Consider updating the existing fixture or installing track lighting. You can also add ambiance with under-the-cabinet task or puck lights that are easy to install. Pendant lights over a bar area or sink can also add a lot to the décor as well as needed extra light. This is another thing to check NBS for. They are a Progress Lighting distributor.

You don't have to take on a tiling extravaganza to refresh the little space over your sink. Add galvanized steel flat sheets as a backsplash and make a sleek, seamless effect that compliment your appliances. Although don’t be afraid to tackle a ceramic tile backsplash. Here is what Mike did in his kitchen one weekend.
Here is the process in his own words:
"Our backsplash was not only plain and white it had some repair work that had been done that left the surface with uneven swirls of drywall compound. In a word it was ugly. After a couple of visits to our big box home centers we chose a travertine tile in a 2"x4" subway pattern. We had wanted glass tile but could not justify the cost. Our compromise was to put a glass mosaic tile accent insert in the travertine. This gave us some of the glass tile we wanted but kept our cost down. I have limited experience doing any tile work but it is something that the average person can tackle with a little patience. A premix mastic was used to adhere to wall and a no-seal grout was used that eliminated the need to seal the grout. However since travertine is covered with tiny holes, and indentations it was necessary to seal it with a stone seal prior to applying grout. If this had not been done the grout would have filled in all the texture of the travertine. This made for easy clean up and no problems having to remove grout that adhered to the surface of the travertine tiles. Does it look like a professional tile job ? Probably not. Is the wife happy ........... yes!" Total material cost..$215.00.
9. Add a Kitchen Cart
Your kitchen can appear more spacious with less items on the countertops. A small kitchen cart can house small appliances and cookware for easy access and free up counter space from clutter. Here is where you can shop around and find one at many of the big box stores or on Craigslist or simply improvise one utilizing a surplus base cabinet on wheels with a top that matches your existing kitchen counter or simply butcher block. Use the cart as a center island and roll it out of the way when you need more floor space.

You'll be surprised how easy it can be to reface your cabinets. Try a faux finish for a rich, antique look. Add some detailed painting to create highlights and shadows that give the sense of depth. Or take out the center face of a cabinet door and install a glass front. When replaced the cabinet hardware in my little kitchen we painted the cabinets a warm cocoa brown, giving a dinky little kitchen a warmer look.
Wednesday, February 3, 2010
Emergency Quick Fixes for Frozen or Leaking Pipes
Well it was ground hog day yesterday and regardless of PETA trying to replace him with a robot weather forecasting device, he saw his shadow and bodes 6 more weeks of winter weather. Hopefully I’m in time to teach you a couple of techniques to make a quick TEMPORARY repair to stop the flow before you have to start building an ark and calling in the animals in pairs much less the idea of your furniture and personal belongings floating in cold water and amidst icebergs.
A frozen pipe can happen anytime and when “Murphy’s Law” prevails, as it usually does, it will be In the worst place possible. This means in a nearly inaccessible place and where the most damage will be inflicted. This being said, fast action is essential so for God’s sake, hopefully you’ve turned off the main water supply before you started searching the internet and found me. If not…STOP READING AND GO TURN IT OFF AT THE MAIN WATER SUPPLY. Now read on.
Most leaks occur at pipe fittings. More serious fractures can occur in other locations and often
result from corrosion, dents or freezing. Temporary fixes generally involve using epoxy patches
or clamps. Permanent repairs usually involve repair or compression couplings, or replacement
of the damaged fitting or pipe section altogether. This will help you make quick fixes in
the event of an emergency then you can make a list of what you will need to make a permanent repair or call a plumber.
IMPORTANT: Never leave a temporary fix installed behind a permanent wall. Remember,
quick fixes are only temporary solutions and you should repair a leak properly as soon as possible.
There are two basic ways to effect a temporary patch, epoxy putty or a patch made from a rubber patch or when push comes to shove an old bicycle tube. Here is a synopsis of each method:

EPOXY
1. Turn off the water supply upstream of the leak.that the area to be patched is clean and dry so that
the epoxy will properly adhere to the pipe.
2. Tear off enough plumber’s epoxy putty to fully cover the surface around the leak. Knead the putty until it
is pliable enough for application.
3. Apply the epoxy putty according to the manufacturer’s instructions.
4. Once the putty has fully cured, turn on the water and inspect for leaks.
5. Alternative: Purchase an epoxy and tape Pipe Repair Kit and follow the manufacturer’s instructions.
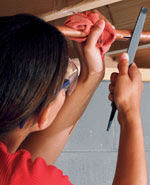
PATCH /Quick Fix Using Clamps
1. Clean the area around the rupture.
2. File down any sharp edges that might cut through the patch
3. Wrap the area with the patch and follow package instructions or wrap the bicycle tube tightly around the break and clamp on both ends.
SKILL LEVEL: novice
TOOLS NEEDED:
Tape measure
Screwdriver (or)
Nut driver
Water-pump pliers
Flat metal file
Scissors
Pipe repair kit (or)
Plumber’s epoxy putty (If you live in a very cold area it would be a great idea to keep one of these on hand at all times)
Repair clamps
Hose clamps
½ inch neoprene rubber or bicycle tube
The details for these repair procedures came from the Home Depot site which has great instructions for all kinds of home repairs. Full credit is given to HD for this information and the pictures included herein. To view the full HD article, go to:
http://www.homedepot.com/webapp/wcs/stores/servlet/ContentView?pn=KH_PG_BM_PL_PI_Emergency_Pipe_Repair&langId=-1&storeId=10051&catalogId=10053
Monday, February 1, 2010
Pros and Cons...Granite vs Concrete Countertops
I have, in the past blogged about how to choose a countertop material, briefly outlining the pros and cons of the more popular choices. I also have written about easy inexpensive things to do to fix up your kitchen, color trends of kitchens today, how to choose a new faucet and the list goes on. I have recently added a “search” feature to the blogsite, that you may not have noticed. It is at the very top of the page on the right. If you are here seeking an answer to specific question or details on a certain subject try searching for one of my more than 170+ blogs. With kitchens and countertops in mind I ran across to articles by Jaime Derringer of Design-Milk, about the pro and cons of concrete versus granite for countertops and found the information useful and informative. The entire content of those articles can be seen at:
http://www.shelterpop.com/2009/10/23/granite-countertops/
and
http://www.shelterpop.com/2009/10/23/concrete-countertops/
The following is my abridgement and comments on those articles. I hope you find them useful and if you still have questions use the “search” function I discussed above. My thanks and full credit is given to the author for the information.
GRANITE
Granite, granite, granite. That's all you ever hear these days when it comes to kitchen and bathroom countertops. Well, there is a reason why everyone wants granite in their kitchens. It's almost a perfect countertop surface, and here's why:
PROS
1. Granite is an igneous rock, formed under high heat. Its structure is crystalline, not layered like sedimentary rock. It's made of quartz with a variety of feldspar minerals and mica. This makes granite extremely strong and durable, and many times impervious to stains, scratches and dents. Please note this says “many times” impervious to stains.
2. You can place hot pots and pans directly on the surface of granite countertops without damage.
3. Granite also holds its value, so even though it is a pricey investment, you should see a 100% return. 4. Since granite is a natural stone, every slab is different. It also comes in hundreds of colors and patterns, so you've got quite a selection to choose from.
CONS
1. Because of its strength and durability, granite is also very heavy. Be sure that your cabinets are reinforced to hold the weight of granite. This can be an extra, unexpected expense.
2. But be sure you love your choice, because granite countertops need to be professionally installed -- sorry DIY'ers, you can't do this one alone. Once installation is complete, it is nearly impossible to remove granite without damaging your cabinets and backsplash.
3. My personal experience has found that even if properly sealed and maintained granite will stain. It absorbs water and can look stained for house and grease and food coloring can be a permanent stain on some granites
Sealing, Cleaning and Care: Granite is very easy to clean by using a mild detergent and warm water. Many times, it will just wipe clean with a wet sponge. Some granites need to be sealed once they have been installed. Be sure to ask a professional if your granite requires a sealant. If you do not use a permanent sealer, you will likely need to reseal your granite every year. It's not all that bad, just about 30 minutes worth of work to keep your stone looking polished and brand new.
How Does It Measure Up? Granite is one of the most desired countertop surfaces for many reasons. It's luxurious, expensive and lasts a lifetime. Compared with most other surfaces, it comes out on top. The only downside is the price. There are other surfaces that look similar to granite but cost much less, including engineered stone and laminate. However, these won't last as long and may damage more easily. If you're really looking for the top of the line product, and won't settle for anything less than the best, granite countertops are definitely the right choice.
CONCRETE
I was watching HGTV the other day and homeowners were creating their own concrete countertops for their kitchen. I immediately thought, "Wow, out of all the possible materials why would they choose concrete?" After doing some research I can confidently say: many reasons.
If you think that the only people who could possibly own a concrete countertop in their kitchen are free-spirited artists living in some cold loft in the city, then you couldn't be more wrong! Concrete is no longer the cold, damp surface that once lived in your basement walls. It's hip, it's chic and it's everywhere. Concrete is basically cement, made of water, sand, pigment and dry mix. You can make your own or you can purchase concrete countertop mixes from professional builders or home improvement stores.
PROS
1. It has an industrial modern look, which many homeowners are going for these days.
2. It's basically cement, so you know that the surface is hard and can take quite a bit of wear and tear.
3. The customization and uniqueness of each piece that is made. You can add just about anything you want into the concrete mixture from recycled glass to glitter.
CONS
1. Although concrete countertops can withstand high temperatures, placing hot pots directly on a concrete countertop is not recommended.
2. You should avoid dragging knives on the surface as well. Spills should be cleaned up as quickly as possible.
3. Cleaning up is easy with just soap and water. Stay away from abrasive cleaners, and anything containing bleach or ammonia because they may damage the sealant.
Sealing, Cleaning and Care: Concrete countertops are similar to many other surfaces in that they need to be sealed. Sealing not only protects the surface but helps increase its durability and maintain its color. It is also recommended that the homeowner use a coat of wax every few months to help prevent damage or moisture buildup.
How Does Concrete Measure Up?: Like marble, granite, soapstone and butcherblock, concrete holds up just as well when treated with care. While it may not have the heat resistance of granite or the scratch resistance of marble it lasts just as long. It is more heat resistant than soapstone and butcherblock countertops however, but it is always wise to err on the side of caution and use a trivet.
DIY Your Own Concrete Countertop: The best part of owning a concrete countertop isn't in the owning but in the making! You can DIY your own concrete countertop. When's the last time someone told you to go to the quarry and DIY your own granite counter?! Check out this great step-by-step tutorial on DIY Network
http://www.diynetwork.com/how-to/how-to-create-and-install-concrete-countertops/index.html
Also, over on Instructables, one DIY-er shows you how he created his very own concrete countertops
http://www.instructables.com/id/Concrete-Countertops-for-the-Kitchen---Solid-Surfa/
and see the whole process.
Friday, January 29, 2010
Replacing Your Bathroom Subfloor V.2
If you are a frequent reader of this blog you know that I have the “Sitemeter” system installed. Not only does it give me an accurate count on my number of visitors it also tells me what question or site led you to me, how long you stayed, how many pages you read, your geographic location and a lot more demographic info. This allows me to see what works for you and what you’re looking to learn. I watch this info daily, usually looking at every visitor daily which can be a job in itself on high traffic days. What this allows me to do is to make sure I giving you answers and material that you want and need. The most widely read of my blogs and most frequently asked questions, should come to you as no surprise, is “whats that smell”. On this subject alone I have probably researched and written 6 or more different blogs, one just last week. Another frequently visited blog is the one I wrote on replacing the subfloor in your bathroom:
http://nationalbuildersupply.blogspot.com/2009/09/replacing-bathroom-subfloor-and-maybe.html
To make sure that you are getting all of the info you need on this subject I found an additional article that gives some even better step by step info on this not so easy task. Hopefully, now, if you read the old blog and combine it with the info below you will be fully prepared to patch or fully replace a bathroom subfloor.
Replace a Bathroom Subfloor in Six not so Easy Steps
If your bathroom subfloor is made of plywood or OSB, chances are that at one point or the other you are going to suffer some water damage to it. Why? Think of all the possibilities for a water leak in a bathroom – sink leaks, bathtub overflows, toilet overflows or leaking wax ring; you get the idea. When this happens, your choice is obvious. You must know how to replace a bathroom subfloor.
1. Dismantle the Bathroom: The bathroom is a fairly small area to hold so many devices. Consider a bathtub/shower, a toilet, a sink, etc. The first thing to do is remove all of these things. Leave the bathtub for last. You don't want to fool with that if the subfloor around it is stable. You will also want to take up your existing finish flooring, obviously. Chances of saving anything here are minimal so don't waste your time on it. Just rip it up! Get some help removing the toilet. These things are so heavy and awkward you can strain your back. If you have a large vanity you may be able to set it in the tub. Or, if the subfloor is stable around it leave it in.
2. Survey the Subfloor Damage: Here's your chance to come to your senses and call a real carpenter. If you are not overcome with the adequate fear, proceed forward. Is it just one spot of the subfloor that went bad? If it is a small section you may get away with a patch job. If the damage is large enough it will warrant ripping up and replacing it all (other than the areas we discussed previously).
3. Remove the Subfloor: Mark out the lines you will be cutting with a chalk line. If you keep your cuts square you will be simplifying the task of installing the new subfloor.
To remove the subfloor you will need a circular saw, safety glasses, a claw hammer, a crowbar, and a chisel. Begin by cutting out the subfloor with the circular saw. Take caution not to run over any nails. Set the depth of the blade just a hair deeper than the thickness of the subfloor. Get out as much as you can with the saw. At some point you will have to resort to the hammer and chisel. When cutting parallel to a floor joist, cut down the center of one so you will have something to nail to. Pull these nails so you will not cut through them with the saw. After the subfloor is out, take a look at the floor joists. If any are damaged you will have to sister them which means to reinforce the existing beam by nailing another beam to it to give the damaged on stability. Remember to use the same size and length of lumber as the one you connect to.
4: Install the New Subfloor: Now it is time to reinstall your bathroom subfloor. If you are planning to go back with ceramic tile as a finish floor, consider installing backer board and skimming it with thin set. Otherwise, use either pressure treated or marine plywood of the same thickness as the original. Nail down or screw with deck screws? I prefer the screws. They have a better hold and are more moisture tolerant.
5. Install the finish floor of your choice: Just remember that laminate flooring is not a choice in a bathroom environment. If you want that look use real wood and two coats of polyurethane.
6. Reinstall everything: Finally, put the vanity, toilet, and anything else back in place. Don't forget to use a new wax ring on the toilet! See my specific blog on how to best go about replacing the ring:
http://nationalbuildersupply.blogspot.com/2009/10/new-idea-for-replacing-wax-ring.html
As always I hope this info along with my other blog on this subject will help you to replace your subfloor as easily as possible. Full credit is given, along with my thanks for the use of this material, to the source of the information contained herein and can be found in its entirety at:
http://www.onlinetips.org/replace-a-bathroom-subfloor
Wednesday, January 27, 2010
Ways To Refresh your Bedroom on a Budget
Have you ever noticed that after the holidays, retailers run out of reasons to get folks to buy so they invented the “white sale”. Mattresses, bed linens and bedding accessories are the subject of all the sale flyers. With this thought in mind and after I have already done blogs on inexpensive ways to freshen up your kitchen and bathrooms on a budget, I decided that now is the time to tackle the bedroom. Now as most of you know I am an old divorced man so what I know about fixing up a bedroom we could probably fit in one sentence so I did some research to see what I could come up with utilizing an article from AOL ShelterPop on ideas to fix up your bedroom for under $10/ Their complete unadulterated article can be found at:
http://www.shelterpop.com/2010/01/10/10-ways-to-update-your-bedroom-for-less-than-10/
and combined it wit some ideas of my own to come up with the following list:
1. Scent it
One of the quickest and easiest ways to freshen up your bedroom is with a new scent. Try using one of the popular fabric freshening sprays such as “ Fabreeze” as a pre-bedtime spritzer on your linens, or place a scented candle (don’t go to sleep with it burning…DUH) on your nightstand for a peaceful scent as you doze off. My housekeeper sprays my whole house down with Fabreeze and even I’m amazed at how clean the house smells for awhile, or at least until I go to the bathroom again or my dog “Nate” fumes up the area with own special spritzer.
Total cost: $5-$10
2. Rearrange
Take inventory of items around your house. Do you have a side table in your living room that could make a great nightstand? Is there a chandelier in your dining room that could brighten up the bedroom? Rearrange furniture in your home to breathe new life into your bedroom. You'd be surprised at the difference you'll be able to make. It is the mainstay of many of HGTV’s design programs today and it really works. Just moving pictures, lamps and rearranging furniture changes your perspective and costs only your labor.
Total cost: $0
3. Paint it
It should come as no surprise that painting is at the top of the quick-fix list. It’s a cheap, quick and easy way to completely overhaul a bedroom. Try a more soothing color such as an ice blue or sage green to promote relaxation. It’s time to do away with the old 70’s eggshell white walls. I’ve read that light green and blue are used in prisons to keep the population calm. I would avoid this idea if someone in your family has had the unfortunate opportunity to have experienced the prison effect themselves.
Total cost: $10 to $50
4. Clean your mattress
You'd be amazed at how many dust bunnies may be hanging around your sheets. Next time you switch out your bedding, take a vacuum cleaner to your mattress and sweep up any allergens that may be lingering. Your bedroom will be fresher. When I was a child we routinely took the mattresses outside and left them in the sun to freshen them. The same applies to the idea of hanging linens in the sun to dry occasionally as well as taking your pillows outside. There is a mattress store chain in my town that is advertising a cleaning service for your mattress utilizing a sterilizing light source and high suction vacuum to thoroughly clean bedding. At the end of the commercial they show a shot of what is removed from an average mattress and its enough to make me want to give them a call.
Total cost: $0
5. Lighten up
Open those shades and let the light pour in! When you leave for work in the morning, open those drapes! Not only will you cut down on your heating bill, but your bedroom will be light and airy when you return home. Of course, when it's time for bed, be sure to shut the drapes and keep your room as dark as possible to ensure your sleep routine isn't affected and to make sure the neighbors are not treated to an unintentional strip show on your part. Frankly my neighbors would only look once, probably blinded by what they saw.
Total cost: $0
6. Move the alarm clock
If you have an LED flashing alarm clock, move it out of eyesight as you get ready for bed. Try placing it on a lower shelf of your nightstand, or simply turn it around. Although you may not realize it, light is one of the most distracting elements when sleeping -- even light from your tiny alarm clock.
Total cost: $0
7. Say goodbye to the TV
The fastest way to make your bedroom more calm and relaxing? Get that TV out of there. Not only is it an eyesore, but it's all too tempting to catch up on your celebrity gossip instead of turning in on time. Good luck with this one, I guess you would know this one is not one of my ideas.
Total cost: Psychiatric Therapy
8. Cool off
If your bedroom's temperature is too hot or too cold, your sleep can be disrupted. Most experts say that a slightly cool room is ideal for sleep, as it matches our internal temperature. I keep a ceiling fan turning at a slow speed year around in my bedroom to keep the air moving and to cool it down.
Total cost: $0 (in fact, you're saving money!) A ceiling fan can be bought for under $50.
9. Write it down
Keep a pen and note pad in your nightstand. Next time you find yourself worrying about the day's events or wake up with that million dollar idea from a dream, write it down and forget about it. Nighttime is for sleeping, not worrying!
Total cost: $5-$10
10. Bring in flowers
Choose some live green plants or occasionally seasonal potted flowers in the bedroom. Live plants take in the carbon dioxide that we exhale and give off oxygen thereby helping to keep the air fresh naturally. Total cost: $10 to $25
11. New Bed linens
Go ahead and bite the bullet and take advantage of the aforementioned "White Sales". I belive the best deals for a complete new look for your bedroom can be found with the "Bed in a Bag" concept, where, for one great price, you get new sheets, pillow cases. comforter or bedspread, pillow shams and bed skirt. I recently bought a new set for my bedroom at "Wally Woeld" for less than $50. A word of caution though, these sets often come with bare minimum thread count sheets which arre only good for tearing up into dust rags. If you have not discovered the luxury of high thread count (say 600 threads per square inch and above) then you havent had the best sleep available. I currently use 1000 thread count on my bed bought at a bargain from an Ebay Store.
Cost $50 to $250
Monday, January 25, 2010
Whats That Smell? This time its a dead critter!
In the never ending pursuit of methane and sewer smells, I continue to get great letters about situations that I haven’t covered or that are new. The one I received this weekend requires that, in the future, I’m going to have to bone up on my pest control knowledge.
Here is how the problem unfolds:
Q: Thank you for such an informative site. We have a similar problem. About a week ago our master bathroom drains were a little clogged, so my husband treated them (sink and separate shower) with drain cleaner. I don't recall if our methane odor began before or after this, but we now have a terribly strong methane odor in there. Our plumber came and said he wasn't sure if the pipes were clogged somewhere. Our p traps had water in them, however the tub trap was not accessible (but it is used about twice a month). He also gave us some sort of bio additive to put down the drains to eat the bacteria. We did this for 4 days, but still have the strong odor. Our plumber recommended a cesspool/plumbing service to scope our pipes for leaks with a snake with a tiny camera. They came today, but sent the cesspool guy as opposed to the camera/plumber guy. Today's man opened our vent (we are in a ranch on a slab) which is near our front door, and looks like a large pipe coming out of the ground. Upon flushing a toilet in the house, he told us it was running slow/clogged. He charged us $400 to snake the line and add sulphuric acid. I'm feeling ripped off tonight as we still have the strong methane odor and now the rest of my house smells like sulphur. I don't understand how a clogged vent would only make the methane smell in one bathroom? Another bathroom is closer to the vent as well as our kitchen. Do you have any other suggestions? Any help would be much appreciated. Additional info- house is 19 years old, cesspool has never been serviced to my knowledge, but we do put that "good bacteria" into the lines every few months. Nothing is backing up. Only symptom is the smell in the one bathroom. Thank you in advance.
A: Many things can cause smells in a bathroom. The first thing that comes to mind is that the wax ring under your toilet has deteriorated. Aggressive chemical use or augering can cause these wax rings to fail or slip out of place. Pour a small amount of cooking oil into the sink and tub to effectively seal the p traps temporarily and then smell around the base of the toilet to see if the smell is coming from there. This is a common problem and easily fixed see blogs below:
http://nationalbuildersupply.blogspot.com/2010/01/toilet-repair-102.html
or
http://nationalbuildersupply.blogspot.com/2009/10/new-idea-for-replacing-wax-ring.html
As to your question about the vent problem, a clogged vent will cause water to be sucked out of the closest P trap (usually the bathtub) so that the vent can breathe, thus the localized smell. It sounds unlikely that the vent is the problem if you have had it unclogged although in extreme cold weather a vent can clog with ice and cause the same problem.
Lastly would be a broken drain pipe caused by the augering and can only be diagnosed with a camera or smoke test but the break in a drain line would not usually localized the smell to a single bathroom but should be apparent all over the house. I Hope these suggestions help. For further research on methane smells and the danger use the search function on my blog through either of the links above. Let me know what you find out.
Epilogue: Thank you so much Richard for your response. Our plumber came back today and jack hammered the foundation and ripped out the vanity. Well, they found a dead mouse, a huge stash of acorns and seeds, and the insulation had been made into the critter's bed. Along with this, came the critter's bathroom. They found a hole for pipes to the outside that had not been sealed up by the builders when the house was constructed that allowed animals to enter and make a home under the floor of the vanity. I can't imagine one little mouse making such a stench, but we are hoping this is it! Our plumber had a short scope and really examined all the pipes he could gain access to and could not find leaks. Keep your fingers crossed! And thanks so much again.
Thanks to this reader for bringing this one to me and helping me to think outside of the box (or maybe the septic tank). The problem with critters dying in your walls is that sometimes you just can’t get to them to remove the remains and stifle the smell. Unfortunately this means waiting for nature to take its course and reduce the remains to a non smelly condition. This means buying stock in Glade or Yankee Candle to manage to live with the smell.
Friday, January 22, 2010
New Year's Resolutions That you Can Live With
On Wednesday I published my version of New Years Resolutions with a large serving of tongue in cheek humor, or at least I thought it was funny. With that aside I figured it’s time to be serious about doing something positive in the new year. We all are facing economic pressures as well as the frequently cited ecological reasons to “go green”. With that in mind and with some basic suggestions from AOL’s Shelter Pop, here is some more ideas for simple things that you can do for 2010.
In addition to the usual New Year's resolutions to get in shape and eat more healthfully, resolve to make your home a cleaner, more efficient and happier place.
1. Get an energy audit. Offered by private consultants or sometimes for free from your local utility company, an audit will tell you exactly what you can do to make your home more energy efficient. If there is an upfront cost it will often pay off over a short amount of time.
2. Adjust the thermostat. Probably one of the best ideas of the last 30 years, the programmable thermostat is the most efficient way to control your direct energy cost for the lowest initial cost. When set for Energy Star's suggested temps: 70 degrees or below in the winter months and 78 degrees or above in warm weather, the programmable thermostat can save you hundreds of dollars per year in heating and air conditioning cost. These can be purchased, usually, for less than $100 and installed by the most bumbling of homeowners in a matter of minutes.
3. Really clean out your closet. Instead of the usual half-hearted closet sweep, take a hard look at your clothes and accessories. If you can't remember when you last wore something, give it away. If you can't fit into a garment, donate it. If the item is damaged, repair it or toss it. Get a friend to help you make hard choices. I am the most guilty of parties in this regard. As a man I resist to throw away anything no matter how old it is or the fact that I haven’t been able to fit into it since the 1960’s. Those super thin ties and wide lapels may come back in style some day even though my need for a suit and tie has long since past. I’m not even going to buried in one opting instead for my favorite daily attire of comfortable elastic waist band shorts and a Ralph Lauren silk and linen camp shirt. I guess I’ve just talked myself into cleaning out my closets.
4. Stop clutter at the door. Instate a rule for your home that every time someone brings something into the house, an item of equal size goes out of the house. Buy a new book? Pick an old one to donate.
5. Go paperless. Stop the never-ending flow of paper. Sign up for online billing and banking. Collect all the catalogs that come to your home and spend an afternoon calling them to get off their mailing lists. Follow the steps recommended at wikiHow to reduce the amount of junk mail you receive.
6. Buy yourself flowers. Don't wait for a reason, buy fresh flowers once a month just because you deserve them. Need more motivation? It may be your wifes birthday or your anniversary so you could just get lucky to have bought the flowers on the right day. Additionally a study from Rutgers University found that flower recipients felt "less depressed, anxious and agitated after receiving flowers." This would certainly apply to your significant other if you forgot a birthday. I grew up in a family home with some pretty well stocked gardens that allowed for fresh flowers, seasonally, all of the time. Although as a child I never felt the effects as an adult I have always appreciated them and they remind me, today, of a more secure time of life and home.
7. Give up the self-storage space. Unless you are in a temporary housing situation or you're storing a treasure trove of valuable antiques, a storage space is a waste of money. Decide whether you want to keep the stuff or toss it and give up the unit.
8. Expect guests. Always keep the living room and kitchen clean enough that you wouldn't be embarrassed for guests to show up unexpectedly. You'll be surprised how nice it is to enjoy your home every day in the way your guests have in the past.
9. Tackle one project every weekend. Make a list of all the little things around your home that you'd like to fix or change, like the mess of plastic bags under the sink or the patch of wall that needs touch-up paint. Take on one task each weekend; when you cross everything off, make a start a new list.
10. Clean green. Swap out your harsh, chemical cleansers for gentler, earth-friendly products. You'll be helping the earth and it will reduce your family's risk of accidental poisoning. I’ve written, several times, in past blogs with ideas for cleaning “green”.
11. Clean out your medicine cabinets. It’s a fact of life, these days, that the most abused drugs are prescription drugs found in your home. We are all guilty of saving old unused prescriptions with the idea that we may need them again. These become a real liability in several ways. They expire and be dangerous if ingested, if flushed down the toilet become a major source of dangerous pollution and are a temptation to children, family and even guests to steal them for their own use and abuse. Do not throw them in the trash or flush them down the toilet. Bag them up and take them to your pharmacy and ask for their help in disposing of them safely.
The Super Bowl is over February7th so this gives you plenty of procrastination time and for excuses to get started. Set the weekend of February 13th as the day to start your first project. If you start with Item #5 it will take care of Valentine’s Day for you at the same time.
Wednesday, January 20, 2010
My Take on New Years Resolutions
I ran across a great article on AOL’s “Shelter Pop” yesterday entitled New Year's Resolutions Start at Home, By Jodi Helmer. The article offers some great ideas for things to do around the house to improve your surroundings giving you both an extreme “COULD” version and a sensible “SHOULD” version. Being the simple man that I am and that I feel most of my readers to be, I have adjusted some of these ideas to better reflect my lifestyle (i.e. single, old, semi redneck man) while deleting some like building myself a Yoga studio or painting my bedroom blue. Ms Helmer’s original ideas are great and deserve a good reading and I credit her fully with the concept. Her article in its original entirety can be found at:
http://www.shelterpop.com/2010/01/13/new-year-s-resolutions-start-at-home/
In the spirit of the New Year my take on the idea of resolutions usually include the obligatory losing weight, which for me ends up with me finding it instead, resolving to spend more time with the kids for which they returned the favor by growing up and moving far away to avoid my resolutions and having never smoked , translates into pestering my smoking friends into quiting.
Easier and more relevant resolutions can be to improve your surroundings. Many people ignore their homes when it comes to making New Year's resolutions that should reflect who you are, so it's the logical place to begin when you're setting goals for the New Year. Using the above mentioned article I came up with a few of the following resolutions to get you started:
Resolution: Frame the artwork and family photos that have been gathering dust in the back of the closet.
You could: Take all of your prints and pictures to a custom frame shop where you can sift through thousands of frames and countless types of photo mats. Sure, the results will be spectacular, but you'll likely spend an amount equivalent to your monthly mortgage to have it done by the pros.
You should: Spend an afternoon wandering through a craft store (with your prints) assessing your options for DIY framing. The shelves are stocked with frames in all sizes and precut mats in a rainbow of colors -- all at a fraction of the price of custom framing. Achieving a custom look is just a matter of mixing and matching the frames and mats. I bought some great fancy little frames this past weekend at a garage sale with the idea of doing this very thing. By the time I got them home that resolution and the frames were given to Shirley Whiteside across the street for her family pictures to hang down her recent newly painted hallway. She appreciated my idea enough that she resolved to sell the frames in the next community garage sale.
Resolution: Seal the drafts coming through the windows to help cut your energy bills.
You could: Replace all of the windows in your home. I covered this idea in a recent “green” household project. The project, which requires a team of professional installers, is expensive. In fact, it can cost up to $1,000 to replace a single window. The return on this investment of new windows is limited: Homeowners will recoup just 77% of their original investment during resale.
You should: As I suggested in my other blog on this, pick up insulating film with a low-E coating at a home improvement store. The film has an invisible layer of metallic oxide that traps heat indoors and helps reduce heat loss through older windows by up to 40%. Unlike the bulky plastic film your parents used to cover the windows during the winter of 1978, this film fits seamlessly over your windows. Home improvement stores sell low-E film for $3 to $12 per square foot.
Resolution: Make your home more secure.
You could: Pay professionals to install an expensive home security system. You see them advertised constantly on TV. You pay a flat rate for the system installation and monthly monitoring fees to keep it operating.
You should: Install motion sensor lights around the perimeter of the house, including front and back doors. Take away the cover of darkness by adding lights, a deterrent to criminals. Discourage would-be criminals by putting a sign in the yard from the home security company or a "Beware of Dog" sign in the front window. No one needs to know your guard dog is an eight-pound Chihuahua named Peanut In my case it’s a 17 pound Welsh Gorgi named Nate who is a great watch dog. He would lay on the sofa and watch the burglars take everything.
Resolution: Clean out the garage.
You could: Declare the task too daunting and let the rusted lawnmower, broken patio furniture and dusty treadmill continue to take up valuable real estate in the garage for another year. You could also put the task off until spring, reasoning that it's better to wait until you can throw open the garage doors and turn your cleaning crusade into a profitable garage sale. I wonder if Shirley would like that treadmill?
You should: Start now. Go through the entire garage, sorting items into four piles: keep, sell, donate and trash. Put all of the items in the "keep" pile into labeled boxes and bins and return them to the garage, and drop off items in the "donate" pile immediately. If the items are too large for you to move -- like that neglected freezer in the back corner of the garage -- call a local charity to inquire about neighborhood pickups. List the items in the "sell" pile on a website like Craigslist, or take them to a consignment store. You'll make a few bucks and have a clean garage, long before garage sale season starts this spring. I like the idea of giving it all to Shirley, she takes pity on me, often, and feeds me.
Resolution: Organize your closets.
You could: Have a closet designer provide an in-home consultation and recommend an organizer that is customized for your closet. The process requires hiring professional installers and writing a sizeable check.
You should: Take a DIY approach to closet organizing. Armed with your closet measurements, head straight to the experts at retailers like IKEA and The Container Store who offer free space planning assistance to customers. You'll get a customized plan and the freedom to pick the products that work best for your space and your budget. Most pre-packing organization systems are easy set up, eliminating the need to spend hefty fees for professional installation. In a single weekend, you can have a picture-perfect closet Or you can use my approach and just not be reminded of the problem by keeping the closet doors closed and resist the temptation to look for ANYTHING.
Resolution: Stop letting dishes pile up in the sink. Man this one was made for me. I am of record has having left the dishes in the sink until I ran out of dishes and silverware on which to eat.
You could: Spend 30 minutes every evening washing and drying the dishes, making sure every plate and utensil has been put away before your spaghetti dinner has even digested.
You should: Load up the dishwasher instead. Believe it or not, using the dishwasher is more energy efficient than washing the dishes by hand. You'll free up time to kick back with the latest issue of your favorite magazine and do your part to help the environment. No dishwasher? Fill the sink with soapy water and let the dishes soak overnight. Tomorrow, you can do the dinner dishes from the past two nights. I like my solution better. My solution? Not enough dishes and silverware, buy more at a garage sale and throw the dirty ones away.
Monday, January 18, 2010
Top 10 Ways you Know that You're a Serious(?) DIY'er or How to Get Conan OBrien's Job
Well I have been watching the late night show wars on NBC. I really never thought I could have a career in show business, but they started advertising that they wanted someone to take the Tonight Show slot when Conan Obrien refused.Then I ran across “The Top Ten Ways you know You’re a Hard Core DIY’er” on my favorite DIY blogsite, ArmchairDIY. My thought, immediately, was that I could become a cross between David Letterman and Tim Allen. In real life I wouldn’t even have to act, just add 200lbs to either of them and you’ve got me! When I got through laughing my tool belt (well my truss anyway) off from reading Armchair’s version I immediately fired off a few more.
Here are theirs:
1. You have lost count of the number of times you have stubbed your toe on building materials while making that first trip to the coffee pot in the morning.
2. You never park in your own garage, unless your truck is broke down and you have to fix it.
3. Your bathroom has no base or casing and hasn’t for at least 17 months and you don’t notice, unless your Mother in law mentions it.
4. More than once you have had to brush drywall dust off of your wife before entering a nice restaurant.
5. Mowing your lawn usually involves weed eating around lumber piles.
6. You will gladly spend 6 hours and 20 buck to fix a $7.00 item.
7. That pile of drywall in the basement, you do know it’s older than your youngest child?
8. You have more knowledge of were things are at the hardware store than most people who work there.
9. You have a refrigerator in your shop.
10. You have said,“But honey, when we are ready to sell you will be so glad we did this
To read their entire blog and many more great articles, including why your beer can may be a great tool, check out:
http://armchairdiy.com/just-for-fun/10-symtoms-hard-core-doityourselfer
Then there’s my ten:
11. Your significant other keeps relevant trades (plumbers, electricians and the insurance company on speed dial)
12. Your health insurance company no longer covers your trips to the emergency room.
13. You know the entire emergency room staff by first name.
14. The local building code enforcement agent routinely makes surprises inspections on your house.
15. Your nickname amongst friends is “Crash and Burn” (I have one of those)
16. You’ve been shocked so many times while working on electrical projects that you have had to attend a 30 day addiction program for the thrill you get from it.
17. The local plumbers union is organizing a protest in front of your house for next Saturday because the IBEW’s was so successful.
18. You’re neighbors and relatives NEVER ask for advice.
19. Instead of a “Honey Do list” your wife has a “Don’t you dare touch that list”.
20. Your children are still playing with boxes from Christmas because the “Jungle Gym” you built for them has been declared a disaster area by the State. Good news is that if it goes through they may pay you to try again and FEMA will provide you with enough funding that you can retire, thus freeing up your time to go to work for NBC…..WHAT A PLAN!!
Friday, January 15, 2010
How to Install a Kitchen Faucet and Side Sprayer
I discussed on Monday’s blog the choices that you have in kitchen faucets and accessories and promised some info on the standard installation procedures. The one detailed below comes from the Home Depot How To Guide, found on their website and is really a generic format for your standard 2 knob, base plate form of faucet with the side sprayer. If you have chosen to go with a single handled unit with the integrated sprayer you will have a lot less work but some extra holes to find a use for in your counter top. Most of the time folks opt for a built in soap dispenser, a instant hot water dispenser or an air gap if you need one. For a video version of these instructions and still pictures along with the full article go to the Home Depot website at:
http://www.homedepot.com/webapp/wcs/stores/servlet/ContentView?pn=Installing_a_New_Faucet&langId=-1&storeId=10051&catalogId=10053&cm_sp=knowhow-_-top_projects4-_-installing_a_faucet-_-march09
So you read my blog about all of the choises in kitchen faucets and got onlone with NBS and orfered your choce now its time to make the big decision....do I install it myself or stop my wife's laughter (this could possibly be nagging) and call the friendly plumber? Installing a new kitchen faucet and side sprayer is a project many homeowners who are handy with a few common tools can do themselves. As you work on your project, be sure to take any actions recommended in the manufacturer's instructions included with your faucet and sprayer.
Step One: Turn Off Water Turn off the water at the shut off valves under the sink or at the main water supply.
Step Two: Connect Supply Lines to Faucet
1. Connect the supply lines to the faucet tailpieces.
2. Tighten the coupling nuts with slip-joint pliers or a basin wrench. \
Step Three: Apply Sealant & Position Faucet
1. Apply a quarter-inch bead of plumber’s putty around the base of the faucet. If your sink is made of cultured marble, use silicone caulk.
2. Insert the faucet tailpieces with supply lines into the holes in the sink.
3. Position the faucet base parallel to the back of the sink and press the faucet down.
Step Four: Screw on Mounting Nuts
1. From beneath the sink, screw the friction washers and mounting nuts onto the faucet tailpieces and tighten the with slip-joint pliers or a basin wrench.
2. Wipe away any excess putty around the faucet base.
Step Five: Connect Supply Lines to Shut Off Valves
Attach the faucet's supply lines to the shut off valves and tighten the nuts. Give the nuts an extra quarter-turn with an adjustable wrench while holding the valve with another wrench.
Step Six: Apply Sealant to Sprayer Base
1. Apply a quarter-inch bead of plumber’s putty to the bottom edge of the sprayer base. If your sink is made of cultured marble, use silicone caulk.
2. Put the tailpiece of the sprayer base into the sink opening.
Step Seven: Screw in Mounting Nuts
1. Place the friction washer over the tailpiece (if needed).
2. If your sprayer hose is not attached to your sprayer, do it now.
3. Screw the mounting nut onto the tailpiece and tighten it with a basin wrench or a pair of slip-joint pliers.
4. Wipe away any excess putty from around the base.
Step Eight: Screw in the Sprayer Hose
1. Screw the sprayer hose onto the hose nipple on the bottom of the faucet.
2. Hand-tighten the hose nut, then tighten it a quarter turn further using a basin wrench or a pair of slip-joint pliers.
3. Turn on the water and check for leaks.
Wednesday, January 13, 2010
Cash for Clunker Appliances.... the Official Version
Back a few months ago as the “cash for clunkers” car program was ending I told you that the next version was a cash rebate program to encourage folks to buy new energy saving appliances instead of cars:
http://nationalbuildersupply.blogspot.com/2009/09/now-its-cash-for-clunker-appliances.html
Well yesterday I ran across the article below on AOL’s “WalletPop” another of my favorite reference sources for my blogs, which will fill in the details and pitfalls of this new government boondogle. “If you have a clunker of an appliance you'd like to replace in this year, the good news is that the government is offering an attractive rebate that can pay you up to $250 for upgrading to a more efficient model. But the bad news is that with this latest version of "Cash for Clunkers" incentives, you'll have to do a lot of clunky work to get your cash. The U.S. Department of Energy and individual state governments are working together to hand out the $300 million allocated for the Cash for Appliance Clunkers rebate program. While this may sound promising, it's not. The lightning speed with which we ran through the money budgeted for last year's automotive "Cash for Clunkers" program, and the involvement of multiple government agencies means consumers can expect a lot more paperwork to stand between themselves and a rebate.
In fact, depending on the state they live in, consumers may be required to submit forms with four different entities: the manufacturer of their new appliance, the retailer that they bought it from, the local utility company and a government agency. (Forms can be obtained at the retailer or online from government agencies. You can also visit ApplianceClunkerRebates.com where you can download a package of forms specific to your appliance.) Some retailers may help consumers to bypass most of the paperwork by granting rebates at the register, although that option could turn out to be limited or short-lived since the retailers have to turn around and recoup the rebate money from their state -- money that could run out before they submit the request. Further complicating the process, qualifying appliances and the rebates they earn vary greatly by state (the information pertaining to each state's program can be found on the Department of Energy's web site.) California, for example, won't start it's program until March while New Jersey has already launched its program. Only heating and cooling equipment currently qualify in New Jersey, though. The state will include other appliances in April. Also, California currently only lists three products that are eligible to turn in for the rebates, while New Jersey accepts 14 appliances so far.
Even after you've navigated the paperwork and all of the different rules, you can't just sit back and wait for that big fat check to arrive. Rebates won't be delivered in one big lump sum, but rather through a collection of smaller ones issued by the appliance manufacturer, the retailer, the government and your local utility. That's why you have to fill out so much paperwork in the first place. Since each state has its own rules and each manufacturer and retailer have their own guidelines for which products qualify and which do not. (A helpful hint: at ApplianceClunkerRebates.com you can plug in your zip code and appliance type and find out how much cash participating brands will give you for each locally-approved model.)
Bottom line: claiming cash for a greener appliance investment could end up being more complicated than filing your 2009 tax return. Mine is the simple IRS form...How Much did you make?...Send it In. On the flip side, you'll be keeping money in your pocket year-round if you replace an inefficient appliance with one that helps to trim utility bills, and that rebate can always be reinvested in other energy-saving improvements for your home.
To make the process just a little simpler, keep the following in mind:
1. Know your state's Cash for Appliance Clunkers start and end dates, as the program's schedule varies depending on where you live.
2. As you shop for appliances, consult with retailers for the most current info on this rebate program, and enlist their help in selecting qualifying appliances with rebate amounts that'll make the process worthwhile. Also be sure to comparison shop for the best local deal on the energy-efficient appliances you're targeting.
3. Don't dump your old appliance until you know whether or not it needs to be taken to the retailer in order to qualify for the rebate.
4. Finally, act fast. As we've seen before, government rebate programs can run out of cash faster than a car crusher can smash a clunker.
To read the entire article on WalletPop go to:
http://www.walletpop.com/blog/2010/01/06/appliance-rebates-the-good-bad-and-truly-clunky-process-of-get/?icid=main
welcome
dl5
link3
http%3A%2F%2Fwww.walletpop.com%2Fblog%2F2010%2F01%2F06%2Fappliance-
Sunday, January 10, 2010
Kitchen Faucets 101
Last week I ran a version of Toilets 101 from the Home Depot website and had some of the highest number of viewers ever. I follwed it with Toilet Repair 102 which I wrote myself and also got great numbers and comments. With the popularity of these two blogs I decided to tackle a series of a couple of blogs on another often questioned plumbing items...the Kitchen Faucet, its many choices, variations and uses. Again starting with research I found the basics of a great description of the faucets available on an educational website from Home Depot.
With that said and with the information below I'd like to encourage you to study your choices and needs carefully then shop around for your best values. Frankly, although it would appear prejudical on my part to now mention National Builder Supply but in honesty and a non-biased approach I would simpley ask that you compare price, convenience and service. Earlier this year I did a pricing study on the top 5 retail and online vendors for plumbing fixtures and found, overall, the pricing difference from the big box stores and the online vendors to be as much as 10% lower on MSRP at the online vendors with NBS being the lowest at 64% of retail (with free shipping) against 74% at the big bix stores. With that said now lets venture into the promised discussion.
"Your kitchen faucet is one of the most frequently used fixtures in your home and a focal point in your kitchen. Once simply a tool for food preparation and washing dishes, today’s kitchen faucets offer exciting new features and enhanced functionality designed to provide ease-of-use and years of trouble-free operation. This buying guide will help you understand what to look for when selecting a kitchen faucet, so you can feel confident the fixture you choose provides the ideal combination of function and style.
Factors to Consider:
Whether you're replacing an old faucet or installing a new one, you'll need to consider these important factors:
• Mounting Options – Deckplate, non-deckplate and wall-mount
• Features and Functions – Handles, sprayers and spouts
• Finish – Tones, features and décor coordination
Mounting Options:
While accessories like deckplates and sink hole covers allow some flexibility, if you’re replacing a faucet on an existing sink or countertop, the faucet you choose should be compatible with the number and spacing of the existing holes. If you’re installing a new sink you can customize the holes to suit the faucet of your choice.
Kitchen sinks and countertops typically have between one and five holes to accommodate various configurations of handles, spouts and any accessories like side sprayers and/or soap or lotion dispensers. Generally, single-handle units require one hole in the sink and double-handle units require three holes, one for each handle and one for the spout. Double-handle faucets that can accommodate sinks with a single hole are available. Sink hole covers are available to conceal any unused holes on the sink.
Kitchen faucets can be mounted in one of three ways:
Deckplate faucets contain the spout and handles in one mounting plate. These units can cover up to three holes in your sink, and up to two additional holes can be filled with a sidespray or soap/lotion dispenser.
Non-Deckplate faucet components like the spout, handles, sidespray and/or soap or lotion dispenser mount individually on the sink or countertop. Depending on the faucet type, these units can fill up to five holes in your sink—spout, two handles, sidespray and soap/lotion dispenser.
Wall-Mount faucets connect to the wall above the kitchen sink. They make it easier to clean sink and countertops while allowing more height for larger vessels. Wall-mount faucets are a good match for apron and undermount sinks with no pre-drilled faucet holes.
Features and Functions:
Once you know the number of holes your faucet requires and which mounting option you prefer, you’re ready to consider handle, sprayer and spout options.
Handles:
Kitchen faucets have one or two handles.
Single-Handle faucets can be attached to the faucet base or stand-alone and require one or two sink holes. Many models come with a mounting plate to cover up to three unused holes and are ADA compliant for people with disabilities. A side sprayer can be integrated in the main faucet deck or as part of the faucet spout.
Double-Handle faucets have separate handles for hot and cold water and require three sink holes. The handles may be integrated with a deckplate or mounted separately. The sprayer is typically separate from the faucet head.
Sprayers:
Sprayers may be located on the faucet spout or to the side. Some faucets incorporate pull-out or pull-down spray heads into the spout that allow you to direct water wherever you choose, providing added convenience and versatility for cooking and cleaning. Pull-Out sprayers have faucet spouts that are curved or angled, allowing the head to be pulled out and extended. They are available for single-handle faucets and useful for washing dishes and vegetables and rinsing the sink. Some units offer an additional spray and/or pause function located within the main faucet head.
Pull-Down sprayers have faucet spouts that rise into a high arc, allowing the head to be pulled down into the sink. They are available for single- or double-handle faucets and allow more space and flexibility in the sink. The pull-down feature often includes a spray and/or pause function.
Side sprayers mount to the side of the faucet and require a separate hole in the sink or countertop. They extend water flow to hard-to-reach areas and make cleaning large pots or preparing food easier and retract when not in use. Side sprayers can often be matched with your existing faucet.
Spouts :
Kitchen faucets come in a variety of spout styles and heights. The type of sink you have may limit some of your options, but generally this isn’t an issue. Select a faucet with a spout that reaches as close to the center of the sink as possible. Average sized sinks require an 8” - 10” spout while larger sinks and sinks with multiple bowls may require a 12” - 14” spout.
Standard spouts are commonly from 3” - 5” high above the plane of the sink.
High-Arc spouts, also known as Gooseneck spouts, are commonly 8” - 10” high above the plane of the sink. They add elegant style, provide more work room and increase range by rotating as much as 180°.
Finishes :
The finish is the surface coating on the spout and handles. Consider a finish that complements your kitchen’s theme and coordinates with décor, lighting and appliances. Many manufacturers have special processes that make their finishes highly durable and resistant to abrasion and discoloration. Many also provide lifetime guarantees that protect the faucet against tarnish, so look for a finish backed by a strong warranty. In the samples of popular finishes below, color representations should only be used as a guide and may not be shown in their true quality due to differences in color monitors. Chrome may have a polished, brushed or matte finish. Durable, economical and easy to clean, it resists oxidation but does show water marks more than some other finishes.
Stainless Steel may have a polished, brushed or matte finish. Durable, economical and easy to clean, it resists oxidation but does show water marks more than some other finishes.
Nickel may have a brushed or satin look and is stylish, durable and easy to clean. Look for units with a titanium finish to better resist scratching and tarnish.
Mixed Colors and metallic tones can be matched to your bathroom’s color scheme. Striking combinations include satin nickel and polished brass, brushed nickel and polished chrome, satin nickel and white, and more.
Brass may have a high gloss, satin or antique finish and is ideal for traditional décor. Faucets with lifetime finishes resist damage and wear.
Bronze complements neutral color palettes and is a popular choice for a rustic look. It may have a polished, brushed or darker oil-rubbed look with highlights and resists scratches, tarnishing and corrosion.
Solid Color finishes may be epoxy or baked-on enamel and clean easily. Popular options include white, black and ivory.
Secondary and Bar Faucets :
Secondary sinks and bar faucets provide added convenience for preparing food or entertaining. When selecting a faucet for a secondary sink, choose one that complements the style and finish of your primary faucet. Secondary sink faucets for food preparation should have both hot and cold water and sprays with high functionality. Secondary faucets or bar faucets for entertaining may require cold water only, enhanced with a water filtration system.
Additional Features :
Adjustable Flow-Rate Restrictor:
Provides complete control over how much water you use. Ideal for areas where water supply is limited or if you’re concerned about conserving water.
Scraper/Brush/Spray Combo:
Dishwashing chores are made easier with a sprayer that features a scraper or brush.
Pot-Filler Faucet:
A faucet mounted over the stove allows you to fill heavy pots without carrying them back and forth to the sink. Many of these faucets feature a double-jointed spout that makes it easy to fill pots on both the front and back burners. This design also allows the unit to fold back against the wall when not in use to keep it out of the way. Some units offer both hot and cold valves.
Instant Hot- or Chilled-Water Dispensers:
If you have an extra sink hole, you may want to consider installing a faucet component that dispenses hot or chilled water for coffee, tea, soup and more.
Filtration :
While most faucets require the addition of a separate filter, some feature a built-in unit that strains impurities such as dirt, rust and chemicals to provide better tasting water for drinking and cooking. Upscale models combine a pullout sprayer with a filter and some have an LCD indicator that monitors filter life.
Touchless or Hands-Free Operation :
Touchless faucets turn on automatically using light and infrared sensors. They offer convenient operation when hands are soapy or dirty, help stop the spread of germs, and save money and water.
The link to the full Home Depot article is:
http://www.homedepot.com/webapp/wcs/stores/servlet/ContentView?pn=Kitchen_Single_Handle&langId=-1&storeId=10051&catalogId=10053&cm_sp=1869f10e-3220-4fc8-b29a-dcd43a9b8901
How to step by step install a new faucet will follow in my next blog on Wednesday.
Thursday, January 7, 2010
Toilet Repair 102
As promised with Wednesday’s blog, today I’m going to embark on a brief discussion of leaking toilets. I’m not talking about running toilets that are leaking through the flapper valve, that was covered on Wednesday, I’m talking about you walk into your bathroom and feel water around your ankles type of leaking. Maybe it’s more subtle and the leak is pouring down through the ceiling from the upstairs bathroom? Now assuming that you don’t have kids like mine, who were famous for floods by caused by overflowing the bathtub, then it’s safe to assume the leak is coming from somewhere around the toilet. The following are the first and foremost reasons that come to mind that cause a toilet to leak.
1. Your wax ring has deteriorated and is causing water flushed to leak out around the base. This can also sometimes cause a sewer smell in your bathroom before it leaks. Wax rings are the sealer that fits between the bottom of the toilet and the drain pipe. They can get old, dry out and leak, they can slip around and cease to fit the drain (more on toilet slipping down the way here) and many times if they slip they can cause a clog and keep the toilet from flushing properly. So there are two warnings that it could be a wax ring failure before the water starts pouring, the smell and the non-obvious clog, and this leak is what most frequently will leak through to the room or area below. It’s a reasonably simple fix if you’re a handy DIY’er. Otherwise it’s best to call a good plumber. For a brief discussion on how to change the wax ring with a great 2 ring system, I ran across a few months back read my blog at
http://nationalbuildersupply.blogspot.com/2009/10/new-idea-for-replacing-wax-ring.html
2. Another cause of toilet leaking as well as other problems is a loose toilet. As a toilet is used we all tend to exert a great deal of force when we sit down and get up from the toilet. The heavier you are the more apt you are to, over a period of time, loosen the toilet flange bolts which cause the toilet to rock and move around. This rocking action can do several things. As I mentioned above it can cause the wax ring to slip, it can cause the actual water connections under the tank to loosen and leak, and if your toilet is a two piece unit (most are) you can actually develop leaks between the tank and the bowl. In this latter situation you may have to disassemble the entire unit and replace the sealing bushings that seal the 2 parts together. Frankly this is where I’d be calling National Builder Supply and ordering a new Toto toilet with all the options…LOL. Otherwise get ready for an all day job in the bathroom. Obviously when you detect water, look for the simple fix. Check to see if the toilet is rocking, if it is slowly tighten the flange bolts that hold it down (they are hidden under those little round caps around the base) being careful to tighten them only slightly and evenly around the base. Then check for connection leaks and tighten those fittings.
3. The last usual place where it might leak is at the shut off valve. Each toilet should have a shut off valve at the point where the incoming water line emerges from the wall. These valves last for years but sometimes will develop a leak or if you use it to shut the water off many times they will not completely shut off when you turn them back on and will develop a leak. In either case it is usually better to replace the shut off valve. Obviously because it is by nature shutting off the only the water supply on one side, KNOW THAT YOU WILL HAVE TO SHUT OFF THE MAIN WATER TO THE HOUSE before you can replace it. I feel stupid having to remind you of that but like the Preparation H package says not to ingest/for anal insertion only, you got to know the warning is there because somebody ate a few without it helping with their hemorrhoids. Likewise there are the handymen who have decided to replace the shut off valve without turning off the main water supply. It takes a lot of buckets to pull that repair off….LOL.
As I try to always say when I finish one of these DIY blogs, I hope it helps you in some way. At least to diagnose the problem even if you decide to call the plumber to fix it.
Wednesday, January 6, 2010
Toilet Repair 101
One of the most frequent questions that comes up in the DIY chat rooms regards a toilet that isn’t flushing correctly, is running all the time, not refilling correctly or is leaking. Each of these problems can be caused by a different function of the toilet but are all (except possibly the leak) involved in the flush mechanism inside the tank. Although this flush mechanism is one of the simplest, non-powered devices ever created by man it still mystifies us all and sends us to the phone to call a plumber more frequently than any other common household problem or turns us into “jiggling” idiots having to jiggle the handle every time you flush it to make sure it refills and is ready to flush the next time it’s used. We caution each other, our kids and our guests…”just jiggle the handle a little when you’re through”. The biggest problem with a malfunctioning toilet isn’t the aggravation it’s the wasting of water. A toilet that isn’t refilling correctly because of a flapper valve not reseating is like leaving your kitchen faucet on at a moderate rate 24 hours a day until you fix the problem.
For those of you that are completely mystified by the workings of a toilet and are losing sleep at night listening to yours running, here is a simple explanation, courtesy of Home Depot called Toilets 101.
http://www.homedepot.com/webapp/wcs/stores/servlet/ContentView?pn=KH_PG_BM_PL_Toilets_101&langId=-1&storeId=10051&catalogId=10053
“Minor adjustments and repairs to your toilet are common tasks every homeowner will face. This guide gives you an overview of the parts in the tank of a modern toilet and advises where to start when problems occur.
Understanding the parts in your toilet makes it easier to repair your toilet yourself. Toilet tank and bowl configurations have not changed much over the years – they’ve just become more efficient. However, the valves that fill and drain the tank have undergone a number of transformations and upgrades.
If you’re having problems with an older toilet that uses more than 1.6 gallons per flush, now is a good time to consider upgrading to a newer, more efficient model. As a rule of thumb, toilets manufactured prior to 1994 use 3.5 gallons per flush (gpf) or more. The manufacturing date and gpf of your toilet is often printed or etched on the inside of the toilet tank. Upgrading to a newer toilet saves you money, conserves water and will ultimately be easier to maintain.
Fill Valve
The fill valve refills the toilet tank from the water supply after it has been emptied by a flush. Fill valves typically use either a float ball attached to a ballcock valve or float cup fill valve. Older toilets tend to use the float ball and ballcock assembly while newer toilets will have a float cup that rises and falls with the water level to turn the valve off and on.
If your toilet is constantly running, you may need to adjust or replace the fill valve. You can adjust the fill valve by adjusting the float arm or the float cup cylinder, depending on the type of fill valve in your tank. More information on how to make these adjustments is available in the Making Minor Adjustments to Your Toilet project guide.

Flush Valve
The flush valve, which installs over the flush hole and houses the flapper and overflow tube, allows water to escape the toilet tank and flow into the toilet bowl.
If water continues to seep into your toilet bowl after flushing, and replacing the flapper fails to resolve the problem, replacing the entire flush valve assembly is a quick and easy solution to this problem.

The Flapper
The flapper is part of the flush valve. When the handle of the toilet is depressed, the flapper rises to allow water from the tank to release into the toilet bowl and then closes to seal water in the tank as the fill valve replenishes the supply.
You may need to replace your flapper occasionally if you use tank tablets containing chlorine or live in an area with hard water where minerals can build up at the base of the flapper."
I hope this little brief discussion will help you to solve your toilet problems. The one issue that this article doesn’t cover is leaking and I will cover that in Friday’s blog. Watch for it and thanks to Home Depot for their content contained herein.
For those of you that are completely mystified by the workings of a toilet and are losing sleep at night listening to yours running, here is a simple explanation, courtesy of Home Depot called Toilets 101.
http://www.homedepot.com/webapp/wcs/stores/servlet/ContentView?pn=KH_PG_BM_PL_Toilets_101&langId=-1&storeId=10051&catalogId=10053
“Minor adjustments and repairs to your toilet are common tasks every homeowner will face. This guide gives you an overview of the parts in the tank of a modern toilet and advises where to start when problems occur.
Understanding the parts in your toilet makes it easier to repair your toilet yourself. Toilet tank and bowl configurations have not changed much over the years – they’ve just become more efficient. However, the valves that fill and drain the tank have undergone a number of transformations and upgrades.
If you’re having problems with an older toilet that uses more than 1.6 gallons per flush, now is a good time to consider upgrading to a newer, more efficient model. As a rule of thumb, toilets manufactured prior to 1994 use 3.5 gallons per flush (gpf) or more. The manufacturing date and gpf of your toilet is often printed or etched on the inside of the toilet tank. Upgrading to a newer toilet saves you money, conserves water and will ultimately be easier to maintain.
Fill Valve

The fill valve refills the toilet tank from the water supply after it has been emptied by a flush. Fill valves typically use either a float ball attached to a ballcock valve or float cup fill valve. Older toilets tend to use the float ball and ballcock assembly while newer toilets will have a float cup that rises and falls with the water level to turn the valve off and on.
If your toilet is constantly running, you may need to adjust or replace the fill valve. You can adjust the fill valve by adjusting the float arm or the float cup cylinder, depending on the type of fill valve in your tank. More information on how to make these adjustments is available in the Making Minor Adjustments to Your Toilet project guide.

The flush valve, which installs over the flush hole and houses the flapper and overflow tube, allows water to escape the toilet tank and flow into the toilet bowl.
If water continues to seep into your toilet bowl after flushing, and replacing the flapper fails to resolve the problem, replacing the entire flush valve assembly is a quick and easy solution to this problem.

The flapper is part of the flush valve. When the handle of the toilet is depressed, the flapper rises to allow water from the tank to release into the toilet bowl and then closes to seal water in the tank as the fill valve replenishes the supply.
You may need to replace your flapper occasionally if you use tank tablets containing chlorine or live in an area with hard water where minerals can build up at the base of the flapper."
I hope this little brief discussion will help you to solve your toilet problems. The one issue that this article doesn’t cover is leaking and I will cover that in Friday’s blog. Watch for it and thanks to Home Depot for their content contained herein.
Monday, January 4, 2010
Toto Washlets....more to the Story

1. I have finally clued in that "washlets" are the high tech toilets that I first encountered in Japan 10 years ago. I leave to your imagination the first experience of sitting on something that looked like the console from the star ship enterprise, and not being able to read Japanese. I started to push buttons, looking for the flush one. Well.... I wasn't sure how to stop the thing and was beginning to wonder if I had to a forward roll off it to avoid a total soaking down my back. Most bewildering - if not the most startling - was the button that resulted in the sound of flushing but no action. I found out afterwards it was a "modesty" button, to disguise any rude noises made by one with delicate sensibilities!
Fast forward 4 years to a similar encounter in Korean. Now the Koreans in general are a bit brasher than the Japanese, and I could no more read Korean than Japanese. I fumbled and hit the "modesty button".... but instead of the subtle sound of flushing, I was blasted with a full volume version of "Orpheus and the Underworld" aka music for the "Can-Can"!!!! I had a tough time gathering the tattered shreds of my dignity through my hysterical laughter as I had to re-join the group of Korean businessmen I was with, as there was no way I was going to explain the cross cultural humor of that one. Trauma aside, the idea of a warm seat in a home kept at a nippy 67 degrees F has an awful lot of appeal and "washlet" is on my wish list for the bathroom redo. By the way, the next generation of "washlets" in Asia can do an instant chemical analysis on the urine, complete with print out! Handy for diabetics and hypochondriacs. Haven't tried that one yet.
2. We are planning our build. I had not given a single thought to the toilets (and I tend to over think everything) I was browsing through this thread and see Toto and Washlet mentioned time and time again. I have been reading them and have a few questions... Is the washlet a separate accessory that you buy? Does it have to have a Toto toilet to fit on? What is the big deal? I heard neorest and see them at over $2000! For a toilet??? I am thinking I must be missing something. Most of the posts go on the assumption that you already know what an amazing work of plumbing this is, but I am completely clueless. I picked the toilet for our basement remodel completely based on price and looks. It works ok. It was under $150. We have 4 boys, I am afraid that that they will definitely make even MORE of a mess with the washlet than they already do with the sink, tub, toilet etc... that we have now. Then again, they are the ones that could most use assistance in the hygiene department. I showed my husband a YouTube video showing the washlet. He says he doesn't think he'd use it. What do I need to know here? Feel free to just direct me to the right thread if I am missing it, but I did search and read up what I could see.
My answer to both:
I’m of record many times here on Garden Web about my Washlet. I purchased one earlier in the year not as a luxury, though it certainly is, but as a necessity. I suffer from Parkinson’s and was finding it more and more difficult to keep myself clean. Another contributor wrote about trying to get one installed for her elderly mother in a nursing home and it dawned on me that it would be perfect for me. I now have had it about 8 or 9 months and have said here online and to friends that if I had an MP3 player and a flat screen TV on mine I would probably just move in there. Not only is the seat warmer great but the heated water that it rinses with is even better. It remains a real popular item with my friends and visitors, many who have tried it and it's as much a conversation piece as the casket I bought myself on EBay that sits in the spare bedroom waiting until I need it! My point is that they are a luxury but can be a wonderful adjunct to the life of an elderly or disabled person also. I highly recommend it.
Now I would like to add that I also have the Toto Ultramax toilets and wouldn’t change brands and read, constantly, as in this thread that they tend to be the very best. The Washlet is easisly added to most brands of toilets and retrofitted to a bathroom wintin 30 minutes and without any pre-existing electrical or additional plumbing. As to your children using the washlet, I am the dad of 3 sons and I’m sure they would have figured someway to have fun with a washlet but generally speaking it has an electric eye on it that keeps it from working unless someone is sitting on it so it’s not as easy to "play" with as you might think and as a previous contributor wrote it has cut down on the toilet paper usage by vast amounts. BTW as my screen name (faucetman) indicates I am a Man, and once your husband tries it he will be with me in wanting more entertainment in there so he can stay longer.
Wednesday, December 30, 2009
Water Hammer v.2

Back in February I wrote a blog about “water hammer”. Water hammer is the most common form of the banging noise that you get when turning a faucet on or off or when the dishwasher, washing machine or sprinkler system cycles on or off. Well maybe because of the weather or just the cyclical nature of how problems begin to reappear on the forums, but water hammer has again begun to be a frequent topic of discussion. My previous blog on the subject can be found at:
http://nationalbuildersupply.blogspot.com/2009/02/whos-that-knocking-on-my-pipes.html
For today’s blog I want to discuss it further with the hope to give some even better understanding. Lets start with a basic question that I ran across on the Do it Yourself Chatroom:
http://forum.doityourself.com/plumbing-heating-cooling-c-fireplaces-air-filtering-water-conditioning-systems-124/
“Q: When the water sprinkler system changes stations (from 1 to 2 and so forth) there is a extremely loud bang in my house. This has been going on for some time. There are also some banging noises when the hot water is being used inside the house and when the toilets are flushed. I need some advice as to how I could fix this problem.
A: Sprinkler systems and wash machines use quick opening valves, you should have shock-trols at those locations. If you have other noise it may be loose pipes, I would deal with the obvious first and see if it helps the prob. First thing is to check your water pressure. Go to Ace, True Value, a big box store or wherever and get a pressure gauge that attaches to a hose bib. They're less than $10. The pressure should be about 50 to 60 PSI. If it's anything over 60 to 70 PSI, install a PRV so you can bring it into a normal range.
Things like sprinkler valves, washing machines, ice makers in the 'fridge -- these use electric solenoids to control the water. The shut off is instantaneous, and they will cause hammering. If there is any play in the pipes, the condition will be worse.
Installing a hammer arrestor is usually pretty easy, especially in the sprinkler system since that's probably PVC piping and readily accessible. All it takes for a hammer arrestor is a length of pipe about 12" long oriented vertically with a cap on the top end. This will act as a 'shock absorber' since it will be full of air, not water. For the sprinklers, simply tee it off of the manifold and have it pointing up. (Where on the manifold it is doesn't matter.)
The entire hot water system doing it means you may need to install an expansion tank at the WH.
The other places you are having the problem will be more difficult to access -- they are behind sheetrock, which means you'll have to be patching the sheetrock after the arrestor is installed.”
This answer is very concise as to some of the causes and easy corrections with the emphasis being on water pressure which is the most frequent culprit. Folks just seem to believe that the higher your water pressure the better which is far from the truth. Not only does high water pressure cause water hammer but can do permanent damage to valves in appliances and faucets and lead to their early demise. If the pipe is suddenly closed at the outlet (downstream), the mass of water before the closure is still moving forward with some velocity, building up a high pressure and shock waves that’s the water hammer. This can also cause pipelines to break if the pressure is high enough and certainly causes additional noise and potential damage to piping that is inadequately anchored in the walls when initially installed. Air traps or stand pipes (open at the top) are sometimes added as dampers to water systems (see pic above) to provide a cushion to absorb the force of moving water in order to prevent damage to the system. If your plumbing is loose or has become loose due to long term water hammer you’re in for a more difficult repair which may include opening walls to re-anchor the pipes. On the other hand, when a valve in a pipe is closed, the water downstream of the valve will attempt to continue flowing, creating a vacuum that may cause the pipe to collapse. This problem can be particularly acute if the pipe is on a downhill slope. To prevent this pressure relief valves, or air vents, are installed just downstream of the valve to allow air to enter the line and prevent this vacuum from occurring..
The following characteristics may reduce or eliminate water hammer:
• Low fluid velocities. To keep water hammer low, pipe-sizing charts for some applications recommend flow velocity at or below 5 ft/s (1.5 m/s).
• Slowly closing valves. Toilet flush valves are available in a quiet flush type that closes quietly.
• High pipeline pressure rating (expensive).
• Good pipeline control (start-up and shut-down procedures).
• Water towers (used in many drinking water systems) help maintain steady flow rates and trap large pressure fluctuations.
• Air vessels work in much the same way as water towers, but are pressurized. They typically have an air cushion above the fluid level in the vessel, which may be regulated or separated by a bladder. Sizes of air vessels may be up to hundreds of cubic meters on large pipelines. They come in many shapes, sizes and configurations. Such vessels often are called accumulators or expansion tanks.
• A device (as pictured above) similar in principle to a shock absorber called a 'Water Hammer Arrestor' can be installed between the water pipe and the machine which will absorb the shock and stop the banging.
• Air valves are often used to remediate low pressures at high points in the pipeline. Though effective, sometimes large numbers of air valves need be installed. These valves also allow air into the system, which is often unwanted.
• Shorter branch pipe lengths.
• Shorter lengths of straight pipe, i.e. add elbows, expansion loops. Water hammer is related to the speed of sound in the fluid, and elbows reduce the influences of pressure waves.
• Arranging the larger piping in loops that supply shorter smaller run-out pipe branches. With looped piping, lower velocity flows from both sides of a loop can serve a branch.
.
Hopefully that’s enough information to help you better understand the water hammer and more importantly the potential for damage to your plumbing which is far worse than just the aggravation of the noise. Don’t wait for the water to come pouring from a wall or for your washing machine to self destruct before doing some about it. Consider the noise as an alarm bell and look for and repair the problem…NOW.
Subscribe to:
Posts (Atom)